💡
This article belongs to the
Walletera series.
This is the second part of a two-part article in which we are using Behavior-Driven Development to implement the DinoPay Withdrawals requirement in the context of the DinoPay Gateway service.
In the first part, we introduced the base concepts of BDD and addressed the Deliberate Discovery Phase. This phase's output is a Gherkin feature file containing a concrete example of a happy path scenario for the DinoPay Withdrawals requirement.
In this second part, we will address the Testing Phase of BDD. This phase involves writing the code that implements each of the steps from the scenario described in the Gherkin feature file and also the application code to make those tests pass.
Along this article, besides learning how to write the test code that executes a BDD scenario, we will also learn how to use some useful tools such as the GoDog library, which will help us bind the test code with the specifications; the testcontainers library, which streamlines the management of Docker containers from Go code; and Mock-Server, which allows us to create a mocked server for the DinoPay HTTP API.
Let's get started.
Testing Phase
💡
All the code from this section can be found in the
dinopay-gateway Github repository.
We will start the testing phase by creating a Go project with the following structure.
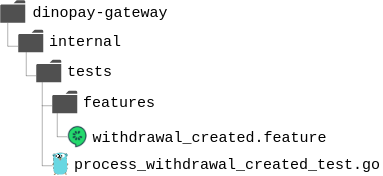
In the withdrawal_created.feature file, we will put the content of the feature file we wrote in part 1 of this article. You can get the content of the feature file from part 1, or you can also get it from the dinopay-gateway GitHub repository here.
The next step is writing the Go code to convert this scenario into an executable test. To do so, we will use a Go package called GoDog. This package works like glue, merging the scenarios written in the Gherkin feature file and the code implemented in the test files into one cohesive whole.
Let's start with a simple version of the test file process_withdrawal_created_test.go.
package tests
import (
"testing"
"github.com/cucumber/godog"
)
func TestFeatures(t *testing.T) {
suite := godog.TestSuite{
Options: &godog.Options{
Format: "pretty",
Paths: []string{"features"},
TestingT: t,
},
}
if suite.Run() != 0 {
t.Fatal("non-zero status returned, failed to run feature tests")
}
}
The file contains a function called TestFeatures. In the function, we initialize the TestSuite that will run each of the scenarios written in the feature file. During the initialization of the TestSuite, we set some configuration options like the format in which GoDog will produce the test’s output, the path to the folder that contains the .feature files, and the testing.T instance that will run the subtests. Then we just run the suite with the suite.Run() method.
Let’s execute this test and take a look at the output. To run it, we use the following command:
go test -v internal/tests/process_withdrawal_created_test.go
The output starts with the content of the withdrawal_created.feature file. We will skip that part. We are interested in what comes next. The first thing we see is the following:
1 scenarios (1 undefined)
5 steps (5 undefined)
558.93µs
This means that GoDog found 1 scenario with 5 steps in the feature file, which is correct. GoDog also says that the steps (and the scenario) are undefined. That is also correct because we haven't implemented the step functions yet.
Below this message, there are some code snippets suggested by GoDog. Let's see them.
func aDinopayEndpointToCreatePayments(arg1 *godog.DocString) error {
    return godog.ErrPending
}

func aWithdrawalCreatedEvent(arg1 *godog.DocString) error {
    return godog.ErrPending
}

func theDinopaygatewayCreatesTheCorrespondingPaymentOnTheDinoPayAPI() error {
    return godog.ErrPending
}

func theDinopaygatewayProducesTheFollowingLog(arg1 *godog.DocString) error {
    return godog.ErrPending
}

func theEventIsPublished() error {
    return godog.ErrPending
}

func InitializeScenario(ctx *godog.ScenarioContext) {
    ctx.Step(`^a dinopay endpoint to create payments:$`, aDinopayEndpointToCreatePayments)
    ctx.Step(`^a withdrawal created event:$`, aWithdrawalCreatedEvent)
    ctx.Step(`^the dinopay-gateway creates the corresponding payment on the DinoPay API$`, theDinopaygatewayCreatesTheCorrespondingPaymentOnTheDinoPayAPI)
    ctx.Step(`^the dinopay-gateway produces the following log:$`, theDinopaygatewayProducesTheFollowingLog)
    ctx.Step(`^the event is published$`, theEventIsPublished)
}
That's pretty cool! GoDog is providing us with a code snippet that we can use to start implementing the undefined steps. If you take a look, there is a function for each of the steps written in the feature file. There is also a InitializeScenario function that maps each function to the corresponding step. Let’s paste this code into our test file.
After adding the code snippets to our test file, we must tell the TestSuite to use the new InitializeScenario function as the ScenarioInitializer . Now the TestSuite initialization looks like this:
suite := godog.TestSuite{
ScenarioInitializer: InitializeScenario,
Options: &godog.Options{
Format: "pretty",
Paths: []string{"features"},
TestingT: t,
},
}
Let’s run our test one more time. Now in the output, we can see the following.
1 scenarios (1 pending)
5 steps (1 pending, 4 skipped)
This is expected, at the moment, we have only dummy implementations of the step functions that return the special error godog.ErrPending.
Cool! We have all we need to start writing our test…

Well, not really. As we will see in the next section, we must set up some infrastructure before writing our tests. Let’s see what's that about.
Test Infrastructure
💡
If you are not interested in the whys and hows, you can check the code that sets up the infrastructure
here and jump straight into the next section, where we will see how to implement the step functions.
To understand what infrastructure we need for the test, let's examine the steps of the scenario described in the feature file one more time.
Given a withdrawal created event:
And   a dinopay endpoint to create payments:
When  the event is published
Then  the dinopay-gateway creates the corresponding payment on the DinoPay API
And   the dinopay-gateway produces the following log:
How is this scenario interacting with the dinopay-gateway? It is publishing a WithdrawalCreated event, which is the input expected by the dinopay-gateway service. Then the scenario verifies that the corresponding request was sent to the DinoPay API and that a certain log line was written. These are the outputs of the dinopay-gateway. So, the scenario only interacts with the service via its public interfaces, producing the expected input and verifying the generated output. This implies that the test implementing this scenario must interact with the service in the same way. This type of test is known as a service test.
So, our test infrastructure should look something like this.
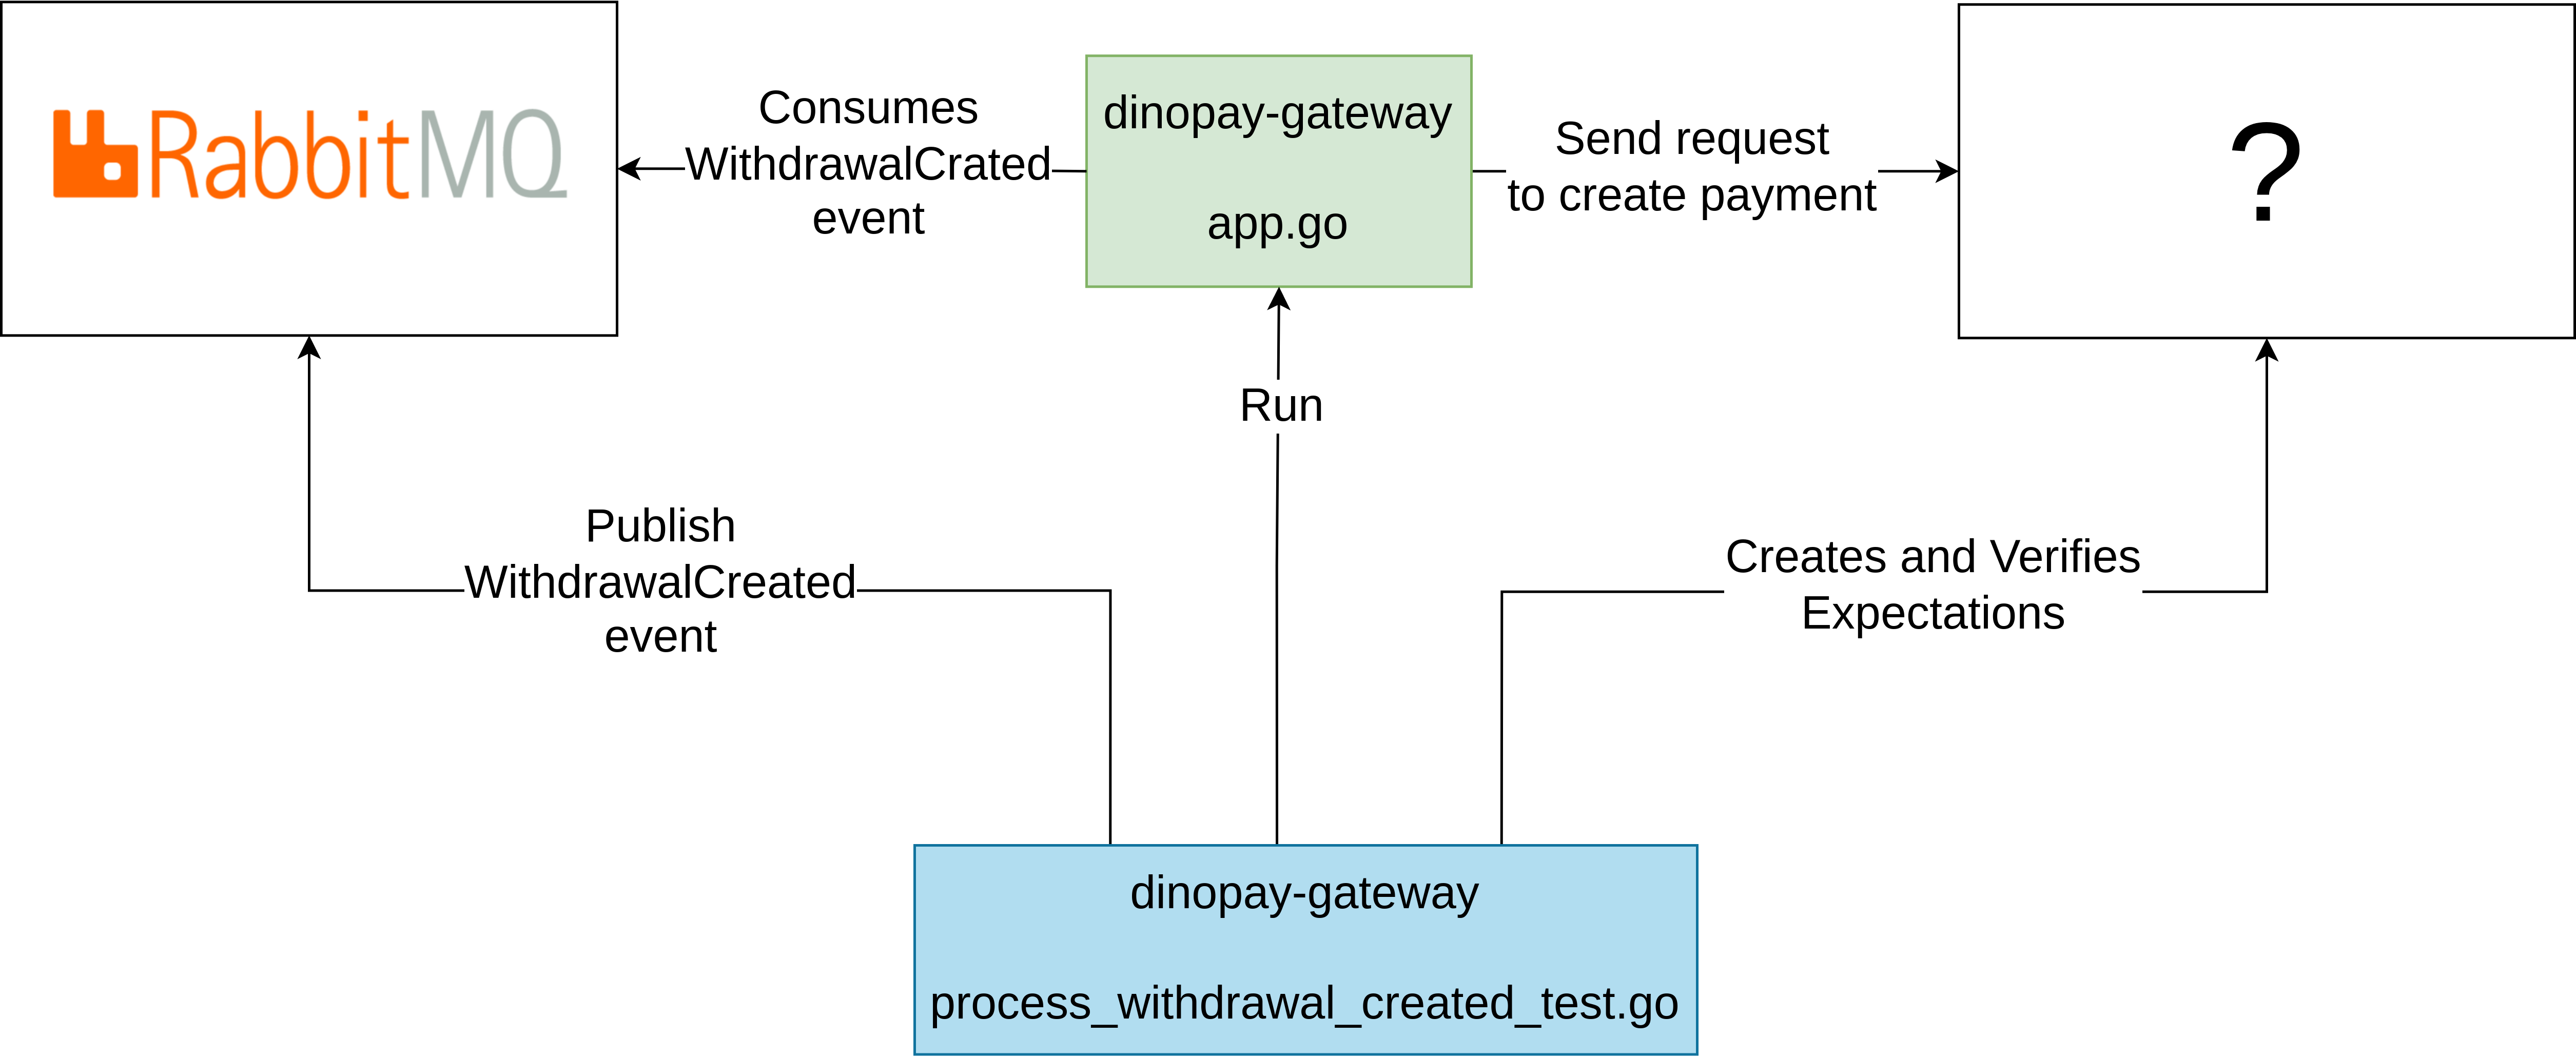
The green box is the dinopay-gateway. It consumes WithdrawalCreated events from a message broker. The requirements didn't impose any particular broker, but given that we already used RabbitMQ in one of the previous articles, it makes sense to continue using it here. The blue box is the test. It will run the dinopay-gateway, publish WithdrawalCreated events on the message broker, and it must also verify somehow that the dinopay-gateway sent the expected request to the DinoPay API. The remaining question is, what should we put on the white box at the right of the dinopay-gateway?
Well, the component at the right of the dinopay-gateway must be something that simulates (or mocks) the DinoPay API. Furthermore, we need a tool that allows the test to verify that we hit the correct endpoint on the DinoPay API and that we did it with the correct parameters.
💡
Even if DinoPay provides us with a test or sandbox environment, we cannot rely on it to run our test. Doing that will make our tests really, really flaky; they will fail every time the DinoPay environment is down. We may also hit rate limit constraints, etc. That's why we need to simulate the DinoPay API somehow.
The tool we will use to simulate the DinoPay API is called Mock-Server. It is an HTTP server that can be configured to return specific responses for different requests. It also allows us to verify that a certain endpoint was called a specific number of times and with the correct parameters.
We know which are the components at both ends of the dinopay-gateway. That's a step forward. Now, we need to think about how we will run these components. We need to run them each time we run our tests. Furthermore, we must do this in every environment where the tests will run, including CI/CD pipelines. So we need to write our test infrastructure in a portable way. If portability is what we need, there is nothing better than the software engineer's best friend, Docker!
Cool, we are going to run our test dependencies into Docker containers. Now, we need to run the needed containers before each test execution, and after the execution is done, we need to remove those containers. Furthermore, we need to synchronize the test execution with the containers to guarantee it only starts once the servers running inside containers are ready (which may happen a couple of seconds after the container starts). To help us with this container’s related tasks, we will use a great tool called testscontainers.
Finally, we have all the necessary pieces to build our test infrastructure. The diagram below shows how these pieces fit together.
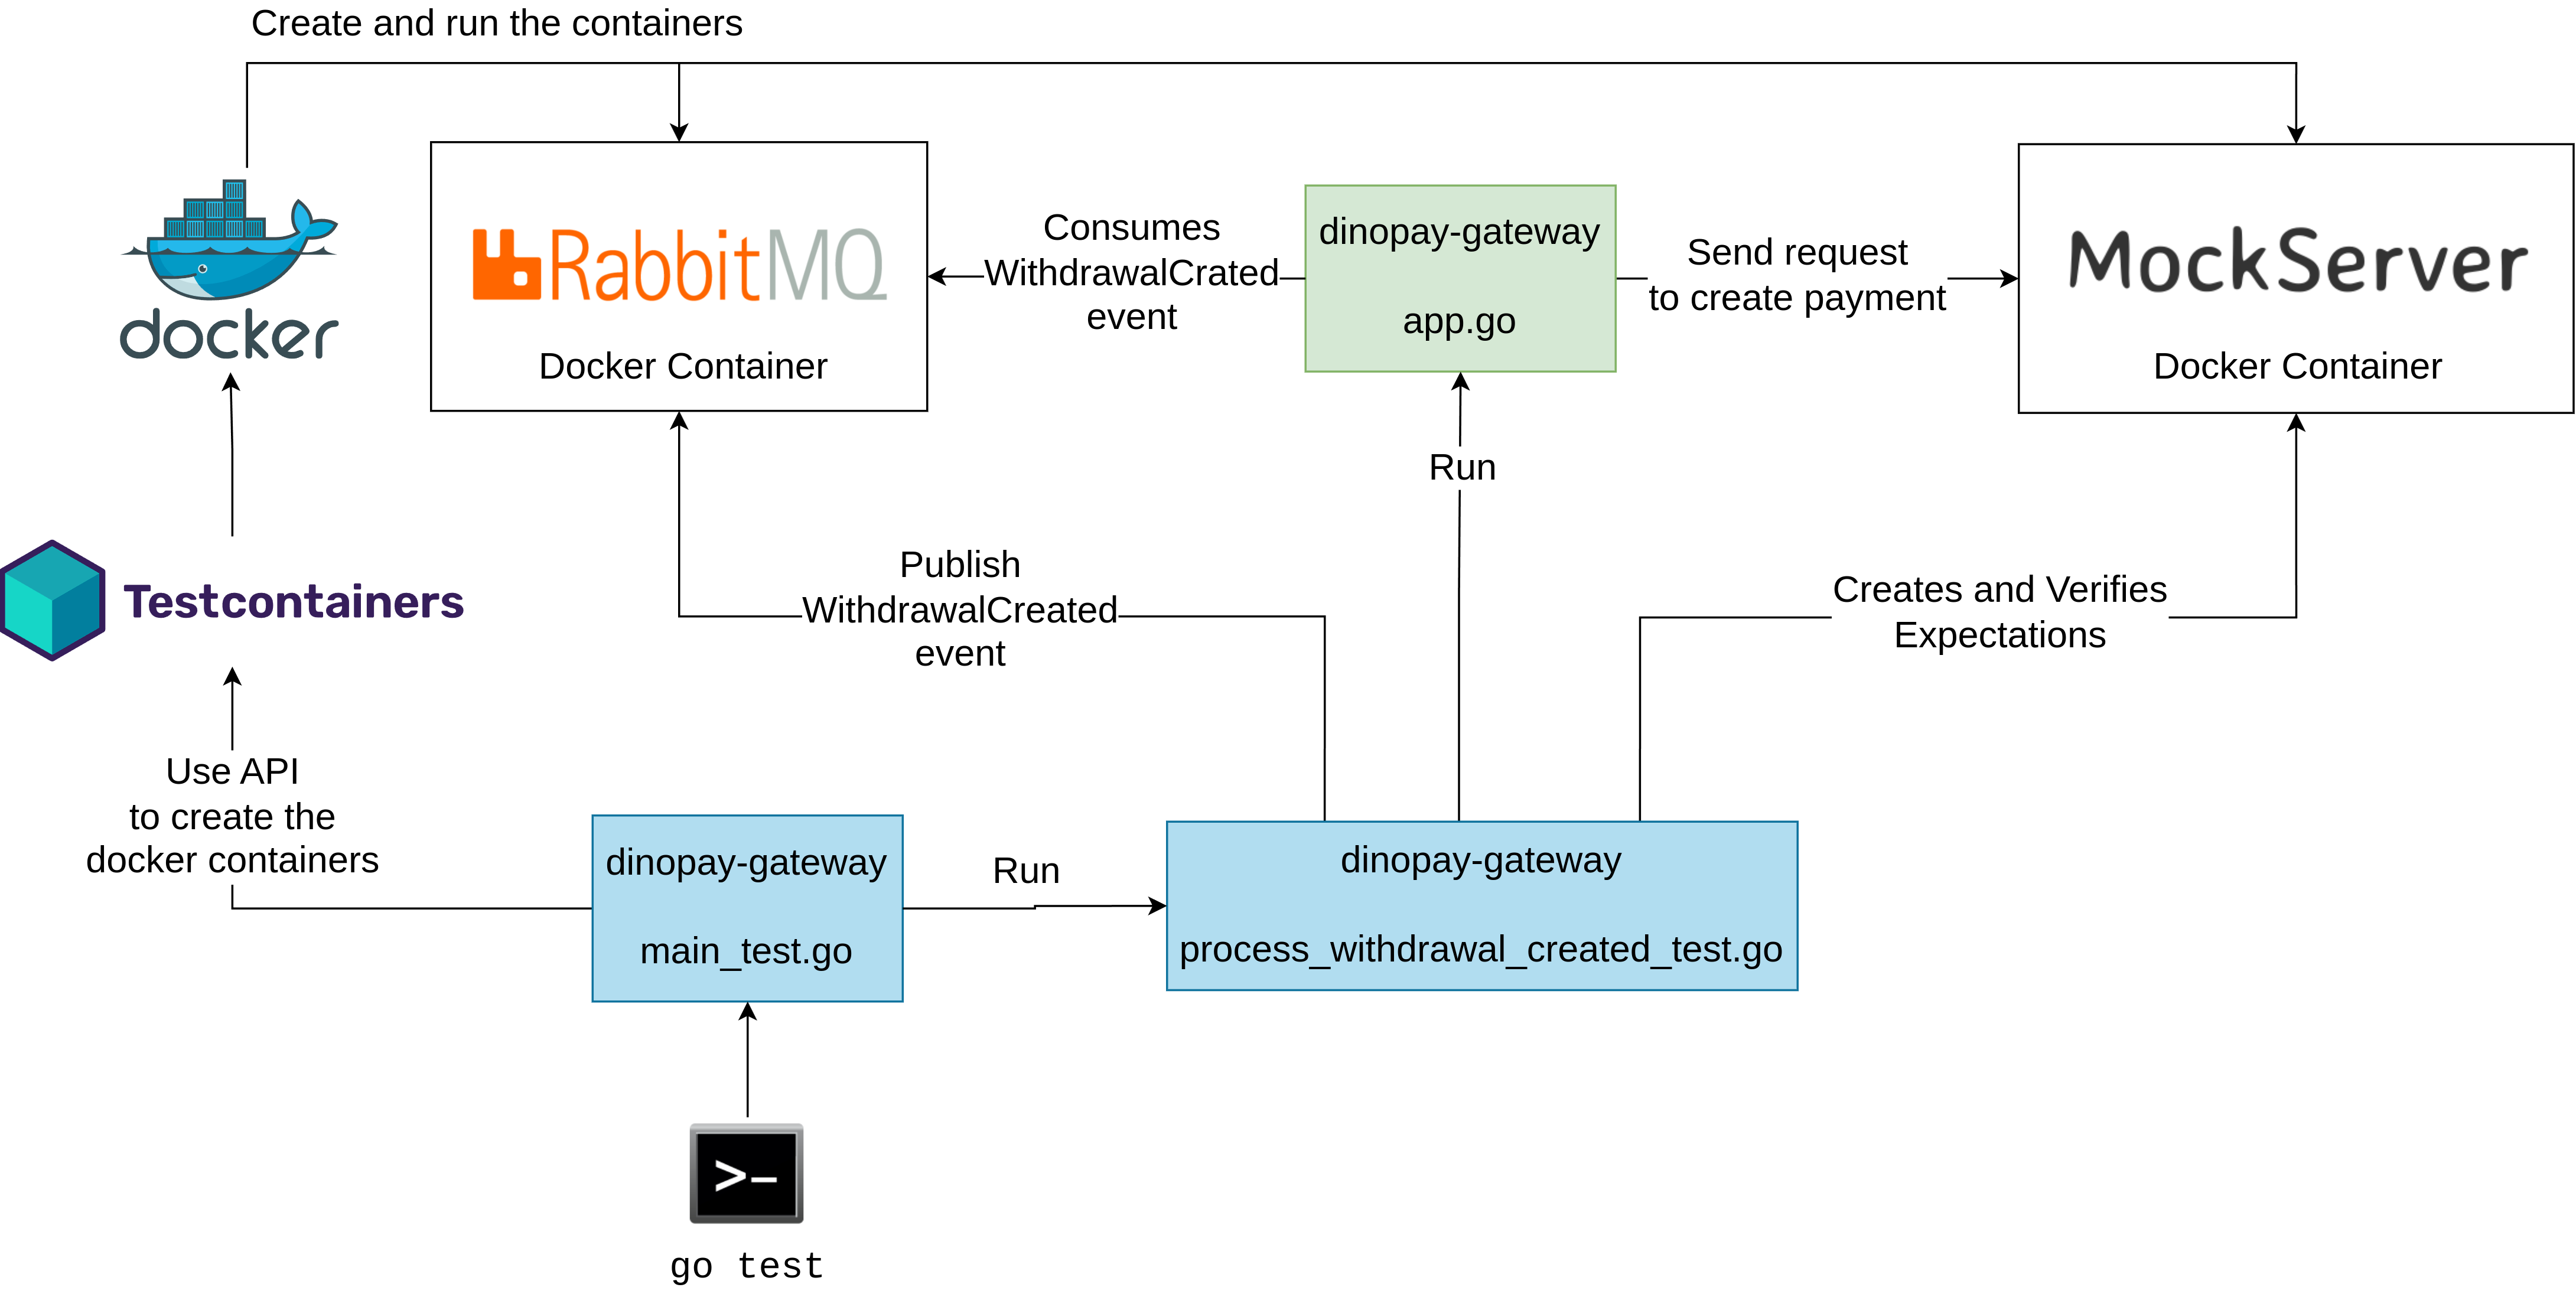
In the diagram, you can see a file called main_test.go. That's where we will implement the code that orchestrates the execution of our test. This includes bringing the infrastructure up, running the test, and shutting the infrastructure down.
The first thing we are going to write in the main_test.go file is a TestMain function. The TestMain function is a special function present in the go testing package that allows us to do extra setup or teardown before or after we run our tests. If there is a TestMain function present in a test file, that function will be called instead of running the tests directly. Let's see how the TestMain function looks in our case.
func TestMain(m *testing.M) {
    ctx, _ := context.WithTimeout(context.Background(), containersStartTimeout)

    terminateRabbitMQContainer, err := startRabbitMQContainer(ctx)
    if err != nil {
        panic("error starting rabbitmq container: " + err.Error())
    }

    terminateMockserverContainer, err := startMockserverContainer(ctx)
    if err != nil {
        panic("error starting mockserver container:" + err.Error())
    }

    status := m.Run()

    err = terminateRabbitMQContainer()
    if err != nil {
        panic("error terminating rabbitmq container: " + err.Error())
    }

    err = terminateMockserverContainer()
    if err != nil {
        panic("error terminating mockserver container: " + err.Error())
    }

    os.Exit(status)
}
We can see here that the function first starts the RabbitMQ and Mock-Server containers, then it runs the tests by calling M.Run() and finally, it terminates the running containers. In the end, it returns the test execution result.
Let’s look into the startRabbitMQCointainer function to see how we use the testcontainers lib to start and stop the docker containers.
func startRabbitMQContainer(ctx context.Context) (func() error, error) {
    req := testcontainers.ContainerRequest{
        Image: "rabbitmq:3.8.0-management",
        Name:  "rabbitmq",
        User:  "rabbitmq",
        ExposedPorts: []string{
            fmt.Sprintf("%d:%d", rabbitmq.DefaultPort, rabbitmq.DefaultPort),
            fmt.Sprintf("%d:%d", rabbitmq.ManagementUIPort, rabbitmq.ManagementUIPort),
        },
        WaitingFor: wait.NewExecStrategy([]string{"rabbitmqadmin", "list", "queues"}).WithStartupTimeout(20 * time.Second),
    }
    rabbitmqC, err := testcontainers.GenericContainer(ctx, testcontainers.GenericContainerRequest{
        ContainerRequest: req,
        Started:          true,
    })
    if err != nil {
        return nil, fmt.Errorf("error creating rabbitmq container: %w", err)
    }

    return func() error {
        terminationCtx, terminationCtxCancel := context.WithTimeout(context.Background(), containersTerminationTimeout)
        defer terminationCtxCancel()
        terminationErr := rabbitmqC.Terminate(terminationCtx)
        if terminationErr != nil {
            fmt.Errorf("failed terminating rabbitmq container: %w", err)
        }
        return nil
    }, nil
}
Let’s break this function down and analyze it piece by piece.
The function starts creating a ContainerRequest which contains the parameters used to get a running container.
    req := testcontainers.ContainerRequest{
        Image: "rabbitmq:3.8.0-management",
        Name:  "rabbitmq",
        User:  "rabbitmq",
        ExposedPorts: []string{
            fmt.Sprintf("%d:%d", rabbitmq.DefaultPort, rabbitmq.DefaultPort),
            fmt.Sprintf("%d:%d", rabbitmq.ManagementUIPort, rabbitmq.ManagementUIPort),
        },
        WaitingFor: wait.NewExecStrategy([]string{"rabbitmqadmin", "list", "queues"}).WithStartupTimeout(20 * time.Second),
    }
In our case, we specify the rabbitmq docker image that we will use to run the rabbitmq container, the container name, and the user that will execute the rabbitmq server inside the container. We also want to expose two ports, the first one is the port that our app (and our test) will use to connect to the rabbitmq server. The second one is the management UI we can use to perform debugging tasks. Finally, we set the WaitingFor parameter. Testcontainers use this parameter to know when the app running inside the container is ready.
Once we have created the ContainerRequest object, we start the container using the GenericContainer function this way:
    rabbitmqC, err := testcontainers.GenericContainer(ctx, testcontainers.GenericContainerRequest{
        ContainerRequest: req,
        Started:          true,
    })
    if err != nil {
        return nil, fmt.Errorf("error creating rabbitmq container: %w", err)
    }
At this point, Testcontainer had instructed Docker to create and start the specified container. The last part of the startRabbitMQContainer function is the return statement.
    return func() error {
        terminationCtx, terminationCtxCancel := context.WithTimeout(context.Background(), containersTerminationTimeout)
        defer terminationCtxCancel()
        terminationErr := rabbitmqC.Terminate(terminationCtx)
        if terminationErr != nil {
            fmt.Errorf("failed terminating rabbitmq container: %w", err)
        }
        return nil
    }, nil
What we are doing here is returning a function that must be used to terminate the container. Check the TestMain function that we presented before to see how it uses the returned function to terminate the rabbitmq container.
The function startMockserverContainer is very similar to the one we just saw. If you want to see how it is implemented you can check it in here.
Before jumping into the step functions implementation, let’s execute the tests to see what happens. We will use a slightly different command now to execute the tests
go test -v -run "TestFeatures" ./…
The first thing we should see is testcontainer starting our two containers, one for rabbitmq and one for mock-server.
2024/03/22 09:24:16 github.com/testcontainers/testcontainers-go - Connected to docker:
2024/03/22 09:24:16 🐳 Creating container for image testcontainers/ryuk:0.6.0
2024/03/22 09:24:17 ✅ Container created: 3463a776cf3e
2024/03/22 09:24:17 🐳 Starting container: 3463a776cf3e
2024/03/22 09:24:17 ✅ Container started: 3463a776cf3e
2024/03/22 09:24:17 🚧 Waiting for container id 3463a776cf3e image: testcontainers/ryuk:0.6.0. Waiting for: &{Port:8080/tcp timeout:<nil> PollInterval:100ms}
2024/03/22 09:24:17 🔔 Container is ready: 3463a776cf3e
2024/03/22 09:24:17 🐳 Creating container for image rabbitmq:3.8.0-management
2024/03/22 09:24:17 ✅ Container created: 67f2eff84cb3
2024/03/22 09:24:17 🐳 Starting container: 67f2eff84cb3
2024/03/22 09:24:18 ✅ Container started: 67f2eff84cb3
2024/03/22 09:24:18 🚧 Waiting for container id 67f2eff84cb3 image: rabbitmq:3.8.0-management. Waiting for: &{timeout:0xc0005d5820 cmd:[rabbitmqadmin list queues] ExitCodeMatcher:0x86f080 ResponseMatcher:0xa5ab60 PollInterval:100ms}
2024/03/22 09:24:29 🔔 Container is ready: 67f2eff84cb3
2024/03/22 09:24:29 🐳 Creating container for image mockserver/mockserver
2024/03/22 09:24:29 ✅ Container created: 6bd84548dcd4
2024/03/22 09:24:29 🐳 Starting container: 6bd84548dcd4
2024/03/22 09:24:30 ✅ Container started: 6bd84548dcd4
2024/03/22 09:24:30 🚧 Waiting for container id 6bd84548dcd4 image: mockserver/mockserver. Waiting for: &{timeout:<nil> Port:2090 Path:/mockserver/status StatusCodeMatcher:0x870560 ResponseMatcher:0xa5ab80 UseTLS:false AllowInsecure:false TLSConfig:<nil> Method:PUT Body:<nil> PollInterval:100ms UserInfo: ForceIPv4LocalHost:false}
2024/03/22 09:24:31 🔔 Container is ready: 6bd84548dcd4
Then we will see the test output, which still says that our steps are pending implementation.
After the test output, we see testcontainer stopping the docker containers.
2024/03/22 09:24:31 🐳 Terminating container: 67f2eff84cb3
2024/03/22 09:24:32 🚫 Container terminated: 67f2eff84cb3
2024/03/22 09:24:32 🐳 Terminating container: 6bd84548dcd4
2024/03/22 09:24:32 🚫 Container terminated: 6bd84548dcd4
There you go! We have our infrastructure ready.

Now we can start implementing the step functions.
Implementing the step functions
Let’s start with the first step. If you remember from part 1 of this article, the Given steps set the initial context of the system. In our case, the context starts with an existing WithdrawalCreated event.
    Given a withdrawal created event:
    """json
    {
      "type": "WithdrawalCreated",
      "data": {
         "id": "0ae1733e-7538-4908-b90a-5721670cb093",
         "user_id": "2432318c-4ff3-4ac0-b734-9b61779e2e46",
         "psp_id": "dinopay",
         "external_id": null,
         "amount": 100,
         "currency": "USD",
         "status": "pending",
         "beneficiary": {
           "id": "2f98dbe7-72ab-4167-9be5-ecd3608b55e4",
           "description": "Richard Roe DinoPay account",
           "account": {
            "holder": "Richard Roe",
            "number": 1200079635
           }
         }
      }
    }
    """
The function implementing this step looks like this:
func aWithdrawalCreatedEvent(ctx context.Context, event *godog.DocString) (context.Context, error) {
    if event == nil || len(event.Content) == 0 {
        return ctx, fmt.Errorf("the WithdrawalCreated event is empty or was not defined")
    }
    return context.WithValue(ctx, rawWithdrawalCreatedEventKey, []byte(event.Content)), nil
}
The first thing to notice is that the function signature is a bit different than the one generated by GoDog. We added an extra parameter of type context.Context, and we also added a return value of the same type. We will use this context to pass the state between the steps. The second parameter of the function corresponds to the event example specified in the step. What we do in this function is add the event to the context under the key rawWithdrawalCreatedEventKey. We will use the event later to perform some verifications.
💡
Every scenario starts with an empty context, and then steps and hooks can add relevant information to it. Instrumented context is chained through the steps and hooks and is safe to use when multiple scenarios are running concurrently.
The second step specifies, using a Mock-Server expectation, the details of the request the dinopay-gateway must send to the DinoPay API to create a payment. Via this expectation, we are telling Mock-Server what to do when it receives a request that matches the values specified in the httpRequest field. In this case, Mock-Server is returning the response indicated in the httpResponse field.
 And  a dinopay endpoint to create payments:
    # the json below is a mockserver expectation
    """json
    {
      "id": "createPaymentSucceed",
      "httpRequest" : {
        "method": "POST",
        "path" : "/payments",
        "body": {
            "type": "JSON",
            "json": {
              "customerTransactionId": "0ae1733e-7538-4908-b90a-5721670cb093",
              "amount": 100,
              "currency": "USD",
              "destinationAccount": {
                "accountHolder": "Richard Roe",
                "accountNumber": "1200079635"
              }
            },
            "matchType": "ONLY_MATCHING_FIELDS"
        }
      },
      "httpResponse" : {
        "statusCode" : 201,
        "headers" : {
          "content-type" : [ "application/json" ]
        },
        "body" : {
          "id" : "bb17667e-daac-41f6-ada3-2c22f24caf22",
          "amount" : 100,
          "currency" : "USD",
          "sourceAccount" : {
            "accountHolder" : "john doe",
            "accountNumber" : "IE12BOFI90000112345678"
          },
          "destinationAccount" : {
            "accountHolder" : "jane doe",
            "accountNumber" : "IE12BOFI90000112349876"
          },
          "status" : "pending",
          "customerTransactionId" : "9713ec22-cf8d-4a21-affb-719db00d7388",
          "createdAt" : "2023-07-07",
          "updatedAt" : "2023-07-07"
        }
      },
      "priority" : 0,
      "timeToLive" : {
        "unlimited" : true
      },
      "times" : {
        "unlimited" : true
      }
    }
    """
The function that implements this step is the following.
func aDinopayEndpointToCreatePayments(ctx context.Context, mockserverExpectation *godog.DocString) (context.Context, error) {
    if mockserverExpectation == nil || len(mockserverExpectation.Content) == 0 {
        return nil, fmt.Errorf("the mockserver expectation is empty or was not defined")
    }

    rawMockserverExpectation := []byte(mockserverExpectation.Content)

    var unmarshalledExpectation MockServerExpectation
    err := json.Unmarshal(rawMockserverExpectation, &unmarshalledExpectation)
    if err != nil {
        fmt.Errorf("error unmarshalling expectation: %w", err)
    }

    ctx = context.WithValue(ctx, dinoPayEndpointCreatePaymentsExpectationIdKey, unmarshalledExpectation.ExpectationID)

    err = mockServerClient().CreateExpectation(ctx, rawMockserverExpectation)
    if err != nil {
        fmt.Errorf("error creating mockserver expectations")
    }

    return ctx, nil
}
This function interacts with Mock-Server via the Mock-Server Rest API to create the expectation that Mock-Server will use to verify our code hits the mocked /payments endpoint with the correct parameters. Note that we store the ExpectationID in the context. We will use this identifier later to ask Mock-Server if the expectation that we created was met.
The next step in the scenario is the When step. This is the step that triggers the scenario.
When the event is published
The implementation of this step consists of grabbing the event that we stored previously in the test context and publishing it to RabbitMQ. Let’s see how to do that.
import (
"github.com/walletera/message-processor/pkg/events/payments"
"github.com/walletera/message-processor/pkg/rabbitmq"
)
func theEventIsPublished(ctx context.Context) (context.Context, error) {
publisher, err := rabbitmq.NewClient(
rabbitmq.WithExchangeName(payments.RabbitMQExchangeName),
rabbitmq.WithExchangeType(payments.RabbitMQExchangeType),
)
if err != nil {
return nil, fmt.Errorf("error creating rabbitmq client: %s", err.Error())
}
rawEvent := ctx.Value(rawWithdrawalCreatedEventKey).([]byte)
err = publisher.Publish(ctx, rawEvent, payments.RabbitMQRoutingKey)
if err != nil {
return nil, fmt.Errorf("error publishing WithdrawalCreated event to rabbitmq: %s", err.Error())
}
return ctx, nil
}
Here we are using our own implementation of the rabbitmq client, implemented in the message-processor repository, to publish the event that we previously stored in the context. The exchange config (name and type) is taken from the payments package located in the same repository. Both the rabbitmq and payments packages will be used in the implementation of the dinopay-gateway service.
The remaining steps are the Then steps. In these steps, we must verify that the output produced by the dinopay-gateway is what we expect.
The first of the Then steps specifies that the dinopay-gateway, after receiving the WithdrawalCreated event, must create a payment on the DinoPay API.
Then the dinopay-gateway creates the corresponding payment on the DinoPay API
The implementation of this step is the following.
func theDinopaygatewayCreatesTheCorrespondingPaymentOnTheDinoPayAPI(ctx context.Context) (context.Context, error) {
    id := expectationIdFromCtx(ctx)
    err := verifyExpectationMetWithin(ctx, id, expectationTimeout)
    return ctx, err
}
The function theDinopaygatewayCreatesTheCorrespondingPaymentOnTheDinoPayAPI gets the expectation id from the context and passes it to another function called verifyExpectationMetWithin . This function, besides the expectation id, also expects a timeout. It will repeatedly call the Mock-Server API to verify that the expectation was met until either the Mock-Server responds with a successful response or we reach the timeout specified, in which case it will return an error. You can check the implementation of the function here.
There is one more output that we expect from the dinopay-gateway in this scenario. It is a specific log entry. The Gherkin step is the following.
    And  the dinopay-gateway produces the following log:
    """
    WithdrawalCreated event processed successfully
    """
To verify that the dinopay-gateway (and any other service from the walletera project) produced a certain log entry, we wrote a package called logs-watcher. Let's see how we used that package to implement the last step of our scenario.
func theDinopayGatewayProducesTheFollowingLog(ctx context.Context, logMsg string) (context.Context, error) {
    logsWatcher := logsWatcherFromCtx(ctx)
    foundLogEntry := logsWatcher.WaitFor(logMsg, 10*time.Second)
    if !foundLogEntry {
        return ctx, fmt.Errorf("didn't find expected log entry")
    }
    return ctx, nil
}
In the first line of this function, we get the logsWatcher object from the context. You may be wondering when we stored the logsWatcher in the context in the first place. I haven't shown that, but it occurred in a function that gets called before the execution of each scenario. This function is hooked to the ScenarioContextBefore event. We do this in the InitializeScenario function. You can check it here.
Once we have the logsWatcher object, we use it to wait for the specific logMsg, which in the case of our scenario, is the string "WithdrawalCreated event processed successfully" . We wait for some time, and if the logline doesn't appear in that period, we timeout and return an error.
We implemented all the steps. If we run the test now, it will FAIL. If you have been paying attention to the test result in the previous executions, the result was always PASS. That was because we had dummy implementations of the step functions. Now, the step functions contain the real implementations. The failure is expected because we still haven't written the dinopay-gateway code.
Let's see what is the error that the test reports.
--- Failed steps:

  Scenario: withdrawal created event is processed successfully # features/withdrawal_created.feature:8
    Then the dinopay-gateway creates the corresponding payment on the DinoPay API # features/withdrawal_created.feature:87
      Error: expectation createPaymentSucceed was not met whithin 5s: request has not been received specified numbers of times

1 scenarios (1 failed)
5 steps (3 passed, 1 failed, 1 skipped)
5.313867789s
=== NAME  TestFeatures
    process_withdrawal_created_test.go:43: non-zero status returned, failed to run feature tests
--- FAIL: TestFeatures (5.31s)
    --- FAIL: TestFeatures/withdrawal_created_event_is_processed_successfully (5.31s)
FAIL
The output tells us the scenario and the step that failed, along with the error message. In this case, the verification of the Mock-Server expectation failed. Then we see a summary of the number of scenarios and steps that failed. Note that as soon as one step fails, GoDog skips the subsequent ones.
Cool, we have our tests in place. Now we must write the dinopay-gateway code that will make these tests pass.
Implementation of the application code
We will leave the implementation details for another article, but if you are interested you can check a very simple implementation here.
After implementing the first version of our dinopay-gateway, and before running the test to verify that the code is correct and does what was required, we must make some modifications to the feature file and also to the test.
In the feature file, we will add the following Background section.
Background: the dinopay-gateway is up and running
  Given a running dinopay-gateway
Background is another Gherkin keyword. It allows us to add some context to the scenarios that follow it. It can contain one or more Given steps, which are run before each scenario.
In our case, we use the Background section to specify that before any scenario is executed, we need a running instance of the dinopay-gateway.
In the test file, we implement the Given step present in the Background section with the following function.
func aRunningDinopayGateway(ctx context.Context) (context.Context, error) {
    appCtx, appCtxCancelFunc := context.WithCancel(ctx)
    go func() {
        err := app.NewApp().Run(appCtx)
        if err != nil {
            logger.Error("failed running app", zap.Error(err))
        }
    }()

    ctx = context.WithValue(ctx, appCtxCancelFuncKey, appCtxCancelFunc)

    foundLogEntry := logsWatcherFromCtx(ctx).WaitFor("dinopay-gateway started", 5*time.Second)
    if !foundLogEntry {
        return ctx, fmt.Errorf("didn't find expected log entry")
    }

    return ctx, nil
}
The function starts the dinopay-gateway App and then uses the logsWatcher to verify that the service started successfully. It also creates a context that is passed to the AppRun method. The context's cancel function is stored in the test context to be used after the execution of each scenario to stop the dinopay-gateway. This is implemented in the After hook of the scenario's context. You can see the implementation of the After hook here.
Let's execute the test one last time. The test must PASS. Let's see what's the output.
Now we see, as part of the test output, the message saying that the 6 steps of the scenario (which includes the Background step) passed.
1 scenarios (1 passed)
6 steps (6 passed)
1.254925584s
--- PASS: TestFeatures (1.26s)
    --- PASS: TestFeatures/withdrawal_created_event_is_processed_successfully (1.25s)
PASS
Closing notes
We have reached the end of this two-part article. Using the implementation of the Walletera DinoPay Gateway as an example, we introduced BDD, a software development methodology that helps product teams align the software development process with business goals and user needs. This increases overall team productivity by reducing rework and wasted effort.
During the implementation of the DinoPay Withdrawal requirement, we saw how to derive concrete examples from the user stories and acceptance criteria. We also learned about a domain-specific language called Gherkin that provides a structured way of writing those examples.
In the second part of this article, we dive deep into the testing phase of BDD. We learned how to translate a Gherkin scenario into executable tests. To achieve this, we used libraries like GoDog and testcontainers and tools like Mock-Server.
If you found this article useful or at least learned something new, please show me some love by leaving some likes. If not, please leave me a comment so I know what I need to improve.
See you at the next stop of the Walletera journey!